Create A Virtual Hard Disk On Windows 10
We all have the partitioned physical hard disk drives on our system. But then, how does a VHD ( Virtual hard disk ) differ from the physical hard disk? Here you go. VHDs are mainly used as hard disks for virtual machines. They completely mimic what the hard disks in our computers have.VHDs too have the same directory structure which is composed of files and folders and the disk partitions. If it has the same structure, you might wonder why would you ever require a separate VHD then! If Microsoft has launched such a feature, then there must be something special about it.
Feeling like creating one for yourselves? Let me take you through the steps of creating a VHD.
STEPS TO CREATE VHD
STEP 1
Open up the Administrative tools app in yours Windows 10 by typing its name in the search bar.

STEP 2.
Once it gets opened up in the Control Panel,towards the right pane you will find an option titled Computer Management shortcut. Double click on it.

STEP 3
Expand the option named Storage found in the left pane of the window that gets launched.You will find an option named Disk Management. Right click on it and choose the option Create VHD.

STEP 4
Once you do that, you will find that a window named Create and Attach VHD pops up. You will find a text box below the option Location. Browse on the path to choose where you need to store the VHD file. Also you can choose the size of the VHD by changing the number next toVirtual Hard disk size. The size by default,will be set in GB. You can change it to MB(megabytes) or TB(terabytes), if required

In my case, I have chosen the path ” S:\syslab\vhd.vhd” to store the corresponding VHD file and I have set its size to 1 GB.
STEP 5
Choose on the option Dynamically expanding as the virtual hard disk type and click on the OK button.
STEP 6
Once you do the above steps, you will find the Virtual hard disk created, towards the right of the window. Right click on it and choose the option Initialize.This helps you to create new volumes on the disk.
STEP 7
Click OK on the alert message that pops up. Go back to the disk created, right click and choose the option New Simple Volume.

The Simple Volume wizard opens up and you will have to click on the Next button to modify the Settings.
STEP 8
Select the size of the volume you want to have and click again on the Next button.I have chosen the option that was set by default.

STEP 9

I have opted to name the drive as P.
STEP 10
In all the rest of the windows,keep clicking on the Next button in order to go with their default options and click on the Finish button in the last window of the Simple Volume wizard.

In the next window that appears, choose the drive letter with which you can name the volume. Once you are done with that, choose the Next button.
STEP 11

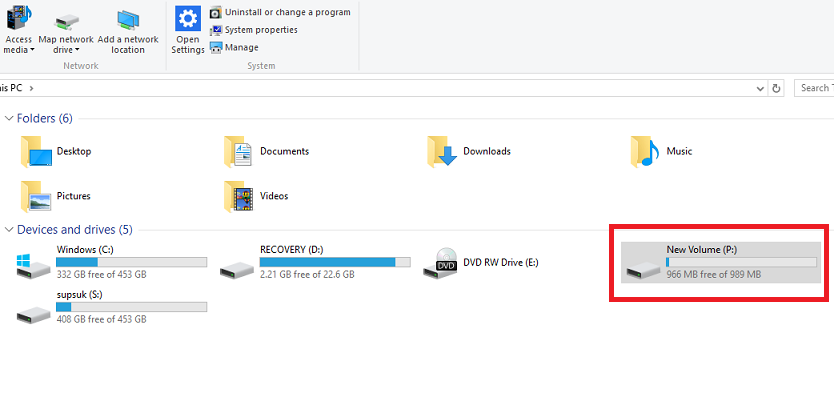
You will find the new VHD creates in the Disk Management utility and the same will be apparent in the File Explorer too. Now, you are completely done with all the process of its creation.
STEP 12
Whenever you want to unmount the drive and retrieve back the space in the system’s memory, just right click on the VHD just created in the file Explorer.Click on the option Eject.The VHD will now be deleted.

Hi I'm Dashrath Goswami Owner and writer of this blog.Loves to write on latest tech.,offensive security ,web, trends and tricks. here you can find tutorials,tips and tricks to stay tuned with technology.if any query do comment or Drop A Mail.
>>>>> Download Now
ReplyDelete>>>>> Download Full
>>>>> Download LINK
>>>>> Download Now
>>>>> Download Full
>>>>> Download LINK Dk